The lights system provides the ending up touch to the design of your spaces. Appropriately the contemporary electrical appliances are developed to enhance the beauty of your areas. In quest for layout advancements, ceiling lights emerged as a great concept from both practical and aesthetic perspectives. Therefore most of the leading brands nowadays provide for the setups of ornamental "fitters" tucked beneath the blades to sustain lamps and their attractive shades.
With a ceiling light kit, you can make one of the most stunning design declaration. An elaborate ceiling light package is perfect for a big hall kind area with a high ceiling. A tiny as well as easy ceiling light on the other hand can lend a fashionable seek to an otherwise simple interior. So it is always advised to choose the ceiling light according to your room size, height of the ceiling, shades of the walls and also the sort of illumination wanted.
Dress up an area or give it an entire new look by discovering just how to alter a ceiling component on your own. Ceiling components can vary from light fixtures for a formal dining-room, a brand-new light and fan mix for a family room, or a face-lift in a lately remodeled space. You can conserve money by setting up a ceiling component by yourself with a couple of devices and also a helper. Even if you have never ever tried a home-installation job, you can learn how to wire a ceiling light by complying with the guidelines below.
1. Shut off the power to the existing light. Locate the main breaker box, and turn off either the individual breaker for the room or the main power breaker. [1] • Always check the power by turning the light switch a few times prior to continuing.
2.
Get rid of the old ceiling light. Use a Phillips screwdriver to unscrew the placing screws, as well as lower the light. It is helpful to have a person to hold the fixture as you uncap the cables and also get rid of any type of electrical tape. Untwist the component cables from the house wiring. [2] 3
3.
Inspect the electrical wiring in the electrical outlet box. Homes constructed before 1985 may have wiring for components rated at 90 degrees as well as much less. Most of the more-recent components require wires that can withstand hotter temperatures. [3] • Seek cords marked NM-B, UF-B, THHN, or THWN-2. These wires are accepted for the higher-temperature fixtures.
4.
Inspect the electrical outlet box to ensure that it is securely secured.
• According to the National Electric Code (NEC), a component that weighs 50 pounds or more will certainly need to have its very own independent electrical box.
5.
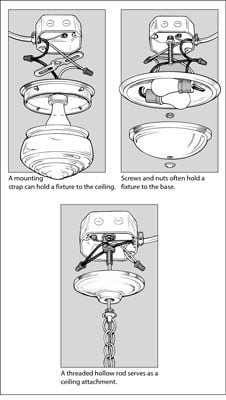
Pre-assemble as much of the ceiling component on the ground as feasible. This will certainly conserve time and also arm stress later on. [4] • Change the length of the rod by aligning the canopy with the bar as well as enabling a little screw thread to extend with the canopy.
• Lock the size in place with a lock nut.
• Thread the screws into holes on each side of the crossbar. If you're making use of a pole, string it right into the center hole of the crossbar.
6.
Move all cables to 1 side of the electrical box.
7.
Mount the bar to the electric box.
8.
Link the cords as they were in the old fixture. The ground cable is the bare copper wire and also should be attached to the green grounding screw in the bar. Cable black to black and white to white. [5] • Have an assistant hold the rest of the fixture while you link the cables.
9.
Tuck the cords into the electric box. [6] 10
10.
Line up the cover with the installing screws and also tighten. Most lighting fixtures will certainly have a keyhole-shaped hole. Straighten the head of the screw into the larger part of the hole, and also twist the component to the narrower component. Tighten the placing screws.
• If you're using a center-mounted ceiling light, slide the cover onto the rod so the nipple shows via the facility opening. Screw on, as well as tighten the placing nut.
• If required, adjust the pole so that the cover sits flush versus the ceiling.
11.
Insert lightbulbs of the correct electrical power.
12.
Hold the globe of the light into setting, and tighten up the setscrews on the side of the canopy.
13.
Turn the power back on.
I was made aware of that article on wiring a pendant light through someone on a different web read the article property. Do you know about another person who is sincerely interested in the topic? Please feel free to promote it. Thanks a bunch for your time. Don't forget to visit our website back soon.

So that you can install this correctly, you need to Stick to the producer’s wiring Directions carefully. Protected all connections perfectly through the use of wire nuts.
Transformers generally have a recommended gauge of wire to work with with their method dependant on the amount of power the transformer can tolerate. Test With all the maker within your distinct transformer to pick which gauge to use.
If you are not guaranteed which kind to pick, use LED lighting. Although the upfront Charge is likely to be slightly better compared to other options, it'll quickly buy by itself. LED lights Will not get sizzling, use significantly less Power, can past ten or even more many years, and there are a number of colour temperatures and brightness possibilities.
Now, you are able to go back to your fuse box and switch the swap back on. Your new fixture should produce light at this stage.
wikiHow is where trustworthy investigate and specialist information occur alongside one another. Discover why men and women belief wikiHow
When attempting any electrical installations in your own home, it also wouldn’t harm to Obtain your finished task analyzed by a totally competent electrician and acquire a minor performs certification.
Nevertheless, if they don’t match, Then you really would need to remove it in the electrical box and mount a fresh a single.
Installing a completely new light fixture seems to generally be a straightforward Procedure. Two wires to attach and dangle the new light fixture. Then you certainly get down the old light fixture and find a mass of white, black, and pink wires.
If you do not have a helper along with your light fixture is hefty or cumbersome, make use of a piece of coat hanger wire, bent within an "S" form and hooked on to the mounting bracket, to assist the fixture As you join the wires.
And no, not only the light switch. Identify the fuse box in your home and turn from the change which provides light to your home you're going to work on.
The following halt is The patron device. It truly is from this resource which the electricity is distributed close to your own home. In just this box, you will have circuits.
Deutsch connectors are especially created for important purposes in severe environments where dust, dirt, moisture, salt spray, and rough terrain can contaminate or injury electrical connections and techniques.
Invest in excess back up lights as these tend to blow speedier than other manufacturers. Now that you have some wonderful, top rated-rated ceiling supporters to encourage you, it is actually time for you to protect One more critical subject.
A black wire, green wire, and white wire are those you have to be accustomed to. When engaged on your challenge, you'll discover that these three wires are joined together with the usage of twist-on wire connectors.